Tuesday, August 21, 2012

A handy little tip...

So there is this pan, it is a square pan. I love my square pan, it is awesome for all kinds of cookng, however my square pan did NOT come with a lid. So if I was in need to "cover and simmer", I was in trouble.


So there was this cookie sheet.... It was a nice cookie sheet, never did anybody any harm, but was not useful because it did not hold enough....so the little cookie sheet was in the pile to go to Goodwill......


So there was this friend, her name is Jenifer. Jenifer is the genius of homemaking! Jenifer was visiting one day and I told her the story of the poor cookie sheet as I was cooking in my square pan. JENIFER told me HER story of how she used things like that as lids for odd pans like my square pan.


Jenifer just saved the cookie sheet from it's certain dimise of the Goodwill bag! And the pan and cookie sheet have been inseperatable ever since!!
 

***Disclosure: do not look closely to my stovetop, it was dirty, we do use it to cook on and it is not easy to get sparkly clean.....it would, however, pass a health inspection which is all that matters to me! :-)

Friday, August 10, 2012

Chicken Pot Pie...winging it!

So I LOVE the chicken potpies you get at the store, however, none of my family do. So I decided they just need a better version of it to fully appreciate the potpie experience. I was going through recipes on pintrest and had an idea, so when I went to the store, I bought a frozen pie crust (it was bottoms only) so then I also went to the refrigerator section and bought a premade rolled up pie crust. Now at this point you may be saying, "why not just make them, it's super easy". Well I would answer by saying,  right after I was married, I tried a "never fails" pie crust from scratch.....it failed, and not only did it fail, it failed EPICLY! I swore off making pie crusts forever! One day maybe, but not now while things are so crazy busy!
          Sooooo anyway! That morning I put 2-3 large frozen chicken breasts in the crockpot with a can of cream of mushroom soup and a can of cream of chicken soup....it cooked all day. About an hour before Supper, I stuck the bottom pie crust in my wonderful new toaster oven,(those really are one of the best inventions, I use mine ALL the time and it does not heat up the entire kitchen! In fact I think my crockpot heats it up more than my toaster oven). Next, while it was cooking, I shredded the chicken in the crockpot. This does not take much effort as it is so tender from cooking. Then , I dumped a bag of frrozen mixed veggies into the crockpot along with some salt and pepper to taste. Once the pie crust is slightly browned, I took it out and poured in the chicken concoction. Filled it to the top! Layed one of the refrigerated pie crusts on top and cut a few slits in it and pinched around the edges. There is no science I have found to this, just do it as you can. Next I ALWAYS wrap foil around the edges of any pie I am baking, or the crusts WILL BURN!! Next I popped it in the toaster oven at 350 for about 45 minutes. When it was done.....oh soooo good! EVERYONE ate it! Although my son picked all the pie crust out, that is fine! I also had enough filling for another pie, which I was going to make and freeze, but my family went for seconds on the filling before I could do that! Simple, fairly cheap, and filling! **will post a picture next time I make it. Wasn't sure how it was going to turn out so I didn't take a pic! But I think we all know what a pie looks like!

Wednesday, August 8, 2012

Chicken, That's what's for dinner!!

 In my efforts to eat at home more and out at fast food less, I have been trying to come up with healthy...ier, meals but still quick and easy. Since we homeschool, I fix a lunch for the three of us daily and on the weekends, it's up to four with my husband home.
I saw these "chicken nuggets" at the store the other day and my mind automatically popped to the grilled nuggets at chick fil a!  While I had NO expectations they would taste like those heavenly tidbits, I hoped to atleast be able to make them palateable!

So today was the test. I was trying to decide HOW to cook them. I thought, I should have planned ahead and maybe marinaded them last night, but since I was not THAT organized (a process I am still working on) I had to come up with something else. My first thought, "where is that stinkin spray on salad dressing?" couldn't find it..... So to the spice rack I went. I ended up layering the (frozen)  chicken on a foil lined sheet, and sprinkled Famous Dave's Rub on them and then a little salt and pepper....real fancy, I know, don't you wish you were as creative as me....NOT!  Then I popped them in my new toaster oven (that you SHOULD be jealous of, I LOVE IT!!) and tried out the broil button. Halfway through, they were turning white as they should and tons of juice, which i promptly dumped down the drain! then turned them over and popped them back in until they basically looked appealing, brown and slightly, the tiniest bit crispy, but not really too much, but definetly brown!

The kids and I LOVED them! While still not as heavenly as CFA, definetly palatable! AND EASY, CHEAP and QUICK! The things I look for in a meal! haha!

Tuesday, April 10, 2012

Cinnamon Sugar Pecans

I was in a pretty good mood today. I had beef stew going on in the crockpot, I had finished the dishes, and the laundry had been well underway all day. So I decided to check out pinterest for a recipe I had been anticipating trying. I had bought a bag of pecans at the store a few days before and kept seeing them everytime I opened the cabnet door to get a plate (I did that on purpose so I wouldn't forget to make them). Went onto pinterest to get the recipe and nothing would come up! UGHHH so I had to go old school and actually google a recipe. The first one that came up was on http://www.cooks.com/  I read the reviews and adjusted a few things and in 20 minutes, I had warm, fresh out of the oven cinnamon sugar pecans! ALOT cheaper than you would pay at the mall or the fair!

CINNAMON SUGAR PECANS


1/2 cup sugar

3 teaspoons cinnamon

1/2 teaspoon salt

1 egg white

3 cups whole pecans (walnuts, brazil nuts, almonds)

Preheat oven to 350°F. Combine sugar, cinnamon and salt. Whisk egg white until frothy and add the nuts. Toss until well coated. Add dry ingredients and stir well.
Spread nuts on a cookie sheet lined with foil, in a single layer.
Bake for 15 minutes.
Cool and store in an airtight container. Can be frozen.

Sunday, January 1, 2012

Repurpose, Reuse

 So I have often heard of going to rummage sales, Goodwill, yard sales etc.... to look for things that not only you need, but things you can make over into things you need/want.... I just always forget! Well, one day I actually remembered. So, while at the local Goodwill, I saw the cutest bed skirt, however it was for a twin bed, which we no longer have any of, but I REALLLY loved the skirt! So I bought it with the decision to remake it into something!


I looked at it, and looked at it and then I figured out, it would be really cute as an apron, however it needed a bit more material to it. My first thought was to use the white fabric already attatched, however it was a bit thin and would not protect my clothes from anything! So I dug in my fabric stash and realized I already had some matching gingham (OFCOURSE I already had gingham, in an assorment of colors, as it is my crack!) and a little sewing here and there, and voila! .......

I LOVE IT!! Made one for my penpal and one for my friend for Christmas, now to get MINE made! I will still have some left over even after that, so I may see a matching one for my daughter in the near future!

Monday, November 14, 2011

processing cushaw squash

So my Dad had told me last year that he looked for Cushaw Squash but could not find any, anywhere, so I found the seeds in a catalogue and planted some this year. When they first grew, I thought I was supposed to pick them whe they were like the size of zucchini. When my Dad saw, he was like "well, I remember them being alot bigger". So I went online and did a bit of research. YES! they should have been much bigger, so I had to wait until fall (which I should have done with the first ones anyway) to harvest some of the others that got to be much larger, as you can see in the picture below.


The one below made 19 cups of puree'! I ended up giving the rest away. I figured that would take me a pretty long time to use up! lol


So the first thing I did was fill my pot with 1"-2" of water, then cut up the stem into chunks that would easily fit in my pot...


However, here is the disclaimer! After handeling the squash this far, I realized all that water that kept beading up on the squash, then becomes a hard film on your hands that even with a scrub brush is hard to get off. SO WEAR GLOVES!


Once done with the stem, I scraped the the seeds out, as you would with a pumpkin. Continue cutting into chunks.


Bring the water to a boil, and then cover with a lid and turn down temp. Let steam until flesh is soft. Then I used prongs to lift the pieces out. As I took out each piece, I layed it on it's side and cut the rind off. It cuts real easy, like going through butter....


Then I put the pieces in my Ninja processer and puree'd until all smooth.


Like I said, that one squash gave me 19 Cups. The recipe I have only called for a cup and a half for one pie. I tasted it, and as I had read, it was very similar to pumpkin, only sweeter.


Cushaw Squash Pie
1 1/2 C Squash
1 C milk
1 C sugar
little salt
1/4 tsp nutmeg
1 tsp vanilla (I sometimes put a bit more in)
2 eggs
1 Tb butter
Mix all together and pour into unbaked pie crust. Sprinkle cinnamon on top.  Bake at 350 for about an hour or until toothpick comes out clean.

Thursday, September 15, 2011

My sewing projects

So I think I have sewed more this year, than in all my previous years put together. Not sure I am getting any better, but I certainly am getting quicker! Ha! Ha! I think having my "craft room" actually accessible helps ALOT, not to mention having to sit in there at my desk while Gracie does homeschool, gives me more time on my hands. SOOO I have taken on the task of trying to "cuten up" my room, so it's more enjoyable to be in. I decided to go with the "vintage retro" theme and have had alot of fun so far. But more on that later. THIS post is about the projects I have done this year......


One of the things I did was make my own handkerchiefs. The ones I had were pretty old, and between my allergies and colds in this house, we were going through kleenex like it was water. Not to mention those stupid things after they go through the washing machine. So I went and found some cute material and made up some new hankies.

THEN I got to looking and decided Flannel would be softer on the nose, especially when one has a cold and raw nose, so got some cute flannel material and made some flankies!! Those are our favorite by far! Not to mention how much money we have saved on Kleenex and trash bags from all the dirty ones! haha!

Next, when I decided to move this nice LOONG table into the kitchen, I still wanted to be able to store stuff underneath, but did not want everyone to see my pots and pans under there! So I made up this cute little curtain and used velcro to attatch it to the table!


Another thing I have to do sometimes is come up with quick solutions to problems like, when your daughter needs to look like a pirate for theme night at church. Well, then an eye patch and sash (not pictured) made out of scrap material, is just what this mission called for.


Sometimes, a gift is needed, sometimes said gift is a gag gift, such as an oversized bib for someone who drops food on their shirts alot! haha!

It also has been nice to be able to recover some swing cushions my mom gave me to go on a swing we almost threw out, but was able to make look nice again!

This is what I call a no sew project, but it uses fabric so I included it anyway, I needed a lampshade to work in my "vintage retro" craftroom, and Loved this material for it, plus it was scraps I had from making some shorts for Gracie!

So finding cute clothes that are modest and look nice on a LITTLE girl (even though she doesn't seem so little any more, she still is ONLY 10!) can be challenging. I found a really cute pattern at JoAnn's and got some material on sale.... PLUS I could cutomize it to fit HER shape and to close up the back, which on the pattern was a bit more open. LOVE customizing!

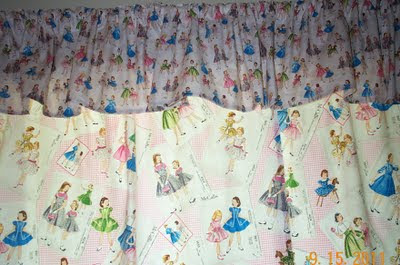
 I had found some really cute material at JoAnn's. At the time, I was not sure what I was going to do with it until I came up with my "vintage retro" (are you tired of hearing that?) theme. Then it was obvious this material was perfect for curtains! And I just got them  hung up today!  yea!

This is the material closer up, sooo cute! It's supposed to be sewing patterns on the bottom curtain, and girls wearing dresses from the 50's on top! 

Lastly, the blue pillows are a pair I recovered with some soft flannel material. The pillowcases behind the blue pillows I made for a Christmas present last year, as well as the blanket.
I have also made lots of shorts, hemmed lots of pants, made more curtains, and many more things I can't think of right now. But safe to say, I have def made good use of the sewing machine I bought years ago!